Another head's up, this post is by Joraaver.
This is going to be a more technical post, as I delve into how I took the stages from Tiled and made proper levels in jME. However, the general introduction and parsing of the maps created by Tiled are well covered by the tutorials Introduction to Tiled and Parsing and Rendering Tiled Maps on GameDev Tuts+. Rather, I'm going to cover what made the process more unique for our purposes during the creation of the game.
Let's get started!
A Sample Stage
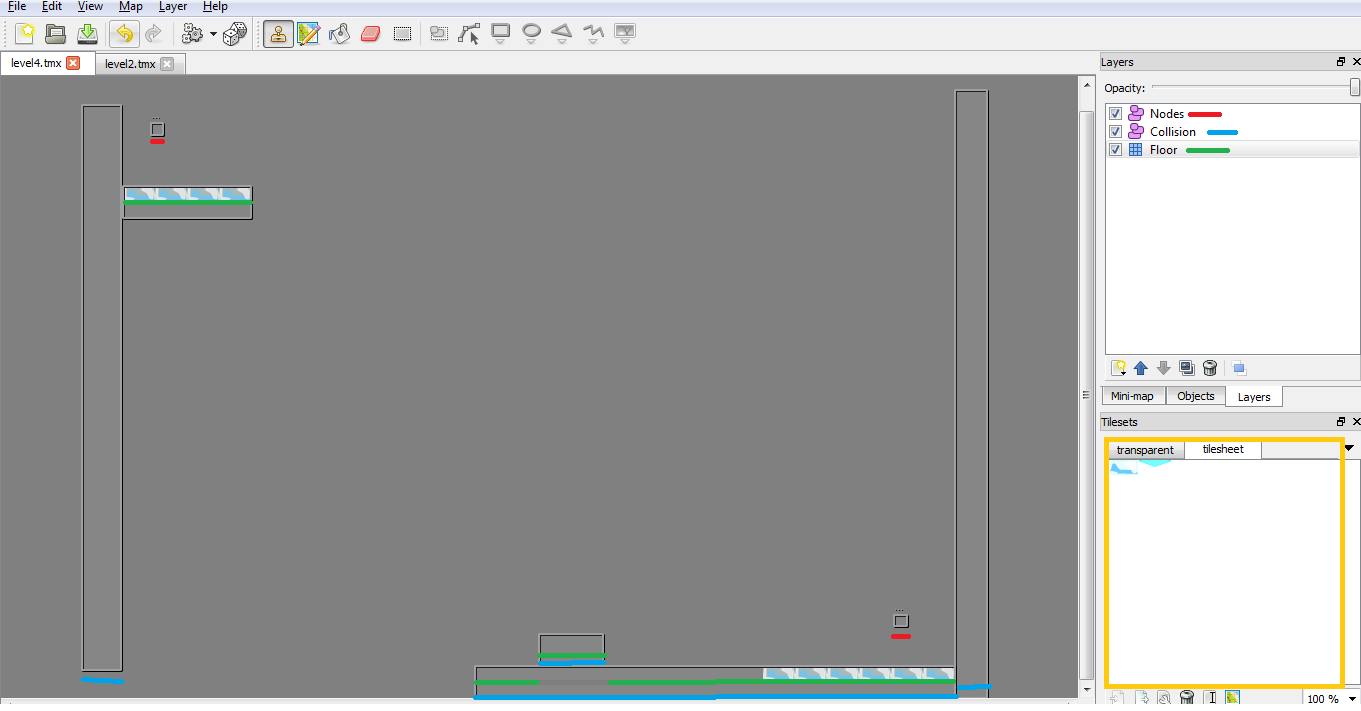
First, let's take a look at one of our stages, built in Tiled:

I've color coded the key elements in the map.
Objects underlined in red indicate they are part of the Nodes layer. These are the "start" and "end" nodes.
Items underlined in blue are part of the Collision layer. These are all the grey outlined rectangles.
The objects underlined in green are part of the Floor layer. The green and blue overlap because the blue will define the physics boundaries, and the green represents where tiles are. Some of the green spots are empty because I chose to use a transparent tile from my tilesheets (which are boxed in orange) for those tiles; you can see the ice blocks are from the tilesheet shown above.
Saving the map in Tiled creates .tmx file, but it is simply an XML file. The tutorial I linked to at the start covers the outline of the xml file well.
This is what my file looks like:
<map version="1.0" orientation="orthogonal" width="26" height="20" tilewidth="32" tileheight="32">
 <tileset firstgid="1" name="transparent" tilewidth="32" tileheight="32">
      <image source="Tiles/transparent.png" trans="ff00ff" width="32" height="32"/>
 </tileset>
 <tileset firstgid="2" name="tilesheet"  tilewidth="32" tileheight="32">
      <image source="Tiles/tilesheet.png" trans="ff00ff" width="64" height="32"/>
 </tileset>
 <layer name="Floor" width="26" height="20">
      <data>
         <tile gid="0"/>
         <tile gid="0"/>
         ...
         <tile gid="1"/>
         <tile gid="1"/>
         <tile gid="2"/>
         <tile gid="2"/>
         <tile gid="2"/>
         <tile gid="2"/>
         <tile gid="2"/>
         <tile gid="2"/>
      </data>
 </layer>
 <objectgroup name="Collision" width="26" height="20">
      <object x="-41" y="47" width="39" height="565"/>
      <object x="0" y="128" width="128" height="32"/>
      <object x="352" y="608" width="480" height="32"/>
      <object x="416" y="576" width="64" height="32"/>
      <object x="832" y="32" width="32" height="608"/>
 </objectgroup>
 <objectgroup name="Nodes" width="26" height="20">
      <object name="start" x="28" y="65" width="12" height="12"/>
      <object name="end" x="771" y="557" width="13" height="11"/>
 </objectgroup>
The three layers are there, along with the name and the attributes of each object in each layer.
Now, time to look at a tad bit of actual code.
Loading the TMX file in Java
Because the tmx file is essentially XML, I needed a good XML parser in Java. A quick Google search returned this StackOverflow question. I looked at the second answer and decided to use the SAX parser, seeing that it had the simplest API, and I had no need to modify the original file.
The syntax to load the file is as follows:
SAXParserFactory factory = SAXParserFactory.newInstance();
SAXParser saxParser = factory.newSAXParser();
DefaultHandler handler = new DefaultHandler(){...}
saxParser.parse(xmlToRead, handler);
The handler is where the magic happens. The callback methods available to use are startDocument, endDocument, startElement, endElement, and characters.
The parse method simply accepts the XML file to read in and the handler with which to read the file.
I'll wrap up the post here. In the next part, I'll describe how I collect all the objects through my handler, analyze how I find and place all the objects on the screen, and then contemplate on some of the obstacles I faced along the way.
